ChatCut Made Simple: Edit Viral Videos with Codex in Plain Language
When you build for overseas markets on your own, your tools are your coworkers.
Today's new coworker is ChatCut. No salary, quick to learn, and just one requirement: speak up first and explain clearly what you want.
ChatCut is an AI editing tool you direct through conversation. Describe what you want, and it edits the video for you.
It works differently from Jianying. With Jianying, you do the editing yourself. ChatCut does it for you.
Contents
- 1. What ChatCut Is — Describe the job in one sentence and it edits for you
- 2. Three Ways In: Which Should You Install? — The official recommendation is desktop; connecting Codex
- 3. A Tour of the Interface — Media, the AI panel, and the timeline
- 4. Your First Cut: Import Media and Say What You Want — From a pile of clips to a first draft
- 5. Captions — Editing the words edits the video
- 6. Exporting — Including editable Jianying drafts
- 7. What Else Can It Do? — Eight prompts you can copy
- 8. The Cost — Free and Pro
- 9. Using It with Jianying — You can use both
- 10. Strengths
- Common Pitfalls
- Quick Reference
────────────────────────
1. What ChatCut Is
Here's the takeaway: Jianying gives you tools; ChatCut gives you results.
In Jianying, you drag in media, cut clips, adjust volume, and arrange things frame by frame. The software makes the work convenient, but you do the work.
ChatCut takes a different approach. Tell it what you need—pick highlights, arrange clips, add visuals, and create captions—and it produces a first version.
With one, you drive. With the other, you say where to go.
Its Most Easily Overlooked Feature
It can export an editable Jianying draft.
This matters because an AI edit will not get everything exactly the way you want. Export it as a Jianying draft and you can continue on a familiar timeline, instead of starting over inside a tool you are still learning.
That feature alone means you do not have to choose between the two tools.
────────────────────────
2. Three Ways In: Which Should You Install?
Official website: https://chatcut.io/ For registration, I recommend signing in with an email address or your Google account.

The official site offers three entry points: ChatCut Desktop, ChatCut Web, and the ChatCut Agent Plugin. Under the plugin, there are two more options: Claude Code and Codex.
| Entry point | How to access it | Best for |
| ChatCut Desktop | Sign in on the web, click your avatar → Desktop App → choose your platform and click Download | Officially recommended for most editing |
| ChatCut Web | app.chatcut.io | Getting started immediately, cloud projects, collaboration |
| Agent Plugin | Start a new conversation in the Claude Code or Codex desktop app to install it | Keeping your main conversation in that app |
Connect any agent, such as ChatGPT, Claude Code, or WorkBuddy.
Call get_active_project through the chatcut_desktop MCP server to connect to "Flying Lavender Anaconda", then read the project, summarize what is currently open, and wait for my instructions. Do not edit anything.
If you are new and just want to try it, use the web version. Nothing to install: open it and work through the process first.
If your media is on your computer or you want high-resolution output, switch to the desktop version.
Only three systems are supported: macOS (Apple Silicon), macOS (Intel), and Windows. There is no Linux version.
The differences between the two versions that actually affect everyday use:
| Web | Desktop | |
| Media | Upload first | Reads local files and folders directly |
| Where exports run | Cloud | Your computer |
| Export allowance | Free: 60 minutes total across all projects | Does not count toward those 60 minutes |
The free tier's 60 minutes is a total across all projects, not an allowance that resets every month. Desktop exports do not use that allowance. If you have lots of media or long videos, that alone may decide whether to install the desktop app.
The official advice is to use the desktop version for most editing. It reads files and folders directly from your computer and exports locally. With capable hardware, it can also produce 4K and HDR output.
Connecting Codex / Claude Code
You do not need to write configuration by hand. The official instructions provide a single prompt; the agent handles the rest.
- Sign in to ChatCut Web first.
- Click your avatar at the top right and hover over “Agent Plugin.”
- Click “Copy” next to “Claude Code” or “ChatGPT/Codex.”
- Paste that prompt into the corresponding desktop app and send it.
- Wait for the ChatCut authorization page to open, then sign in and allow access.
- Start another new conversation. Plugin tools load only when a conversation starts, so they are not available in the conversation that installed them.
- In the new conversation, explicitly say “Use ChatCut,” then explain what you want to edit.
The prompt copied for Codex is:
/goal Read chatcut.io/chatgpt to install the ChatCut plugin and set up a new task for me.
The Claude Code prompt is the same, except the URL is chatcut.io/claude. WorkBuddy does not yet have a copy button; follow its own installation guide.
A few common sticking points:
- Only desktop apps can install it. The web versions of Claude and ChatGPT, remote browser workspaces, and ChatCut Web cannot.
- Authorize one connection at a time. Do not start two simultaneously.
- Do not paste cookies, access tokens, usernames, or passwords into the conversation. Signing in once on the authorization page is enough.
- The plugin does not update itself. It comes from a Git marketplace, so you need to run update commands manually.
# Claude Code
claude plugin marketplace update chatcut-inc
claude plugin update chatcut@chatcut-inc
# Codex — the marketplace name is assigned when it is added; list it first to check.
codex plugin marketplace list
codex plugin marketplace upgrade <marketplace-name>
Check whether the connection is installed:
# Codex
codex mcp get chatcut
# Claude Code
claude mcp get plugin:chatcut:chatcut
There is also a reverse route: keep your conversation in the Codex or Claude Code desktop app and let it operate the project open in ChatCut Desktop. This uses local MCP and has three requirements:
- ChatCut Desktop must be installed and have been opened at least once.
- The other app must be on the same computer.
- ChatCut Desktop must be running.
Once connected, an agent icon appears in ChatCut's top bar. Open it to see which agent is connected and whether the connection works. If it says “Reconnect,” click it. ChatCut Desktop registers its local MCP service with supported apps automatically; no handwritten configuration is needed.
────────────────────────
3. A Tour of the Interface
When you open the editor, there are only a few areas to learn.
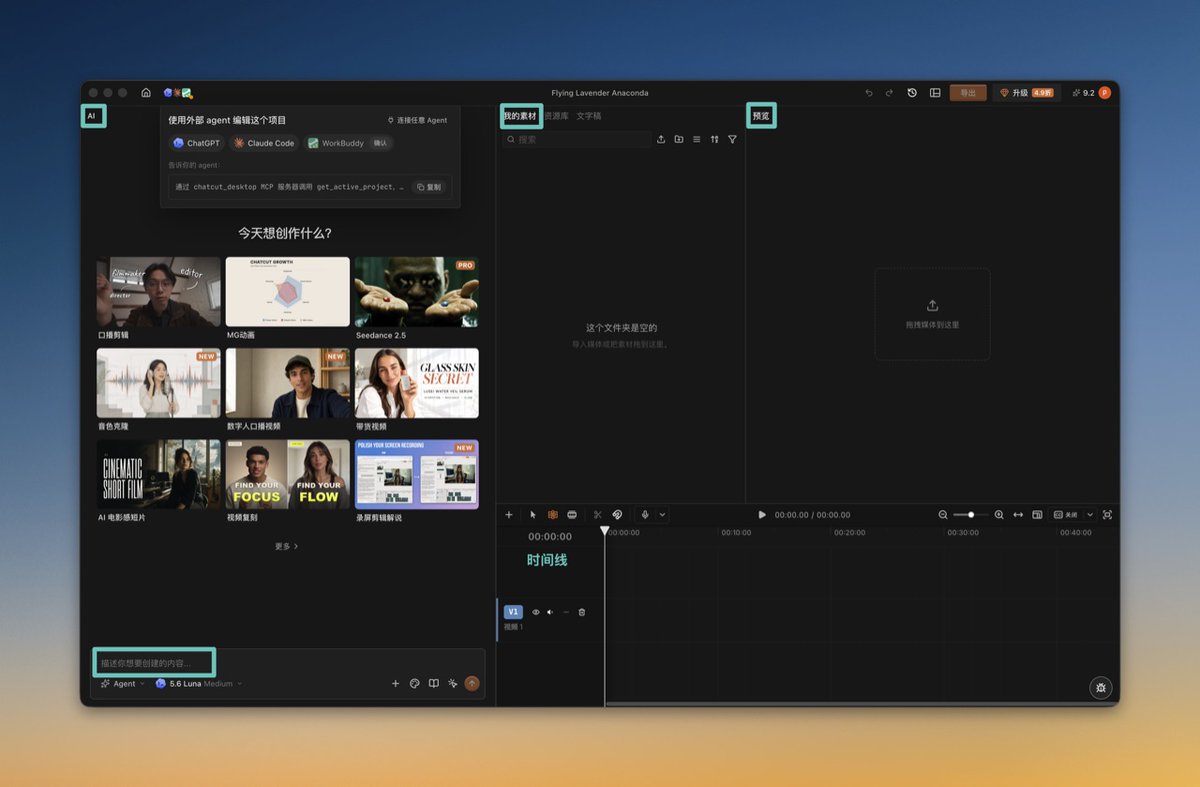
Library. This holds videos, images, and music. The desktop app can read folders directly from your computer, so you do not have to upload each item separately.
AI panel. This is the core of the workflow. It contains the AI input box, Agent selector, Selection Mode, Skills, and Design Styles.
The Agent selector determines who does the work: ChatCut's own agent, Claude Code, Codex CLI, or Hermes Agent. The last three appear once the corresponding tools are installed locally. If they are missing, it tells you what else is needed.
Work performed by a local agent uses that tool's own account and allowance, not ChatCut credits.
Preview. Watch the video here.
Timeline. V1, V2, and so on are video tracks; A1, A2, and so on are audio tracks. Higher tracks cover lower ones. The number of tracks is flexible: add as many as you need. You can still drag things manually after the AI edits.
Captions. These are on the playback controls, not in the sidebar. The split “Captions” button toggles visibility on the left; the arrow on the right opens caption styles.
In ChatCut, “editing” is a conversation, not a button. This is its biggest interface difference from Jianying: in Jianying you look through menus; here you type.
────────────────────────
4. Your First Cut: Import Media and Say What You Want
Three steps.
- Click Upload in the library and select files, or drag them straight into the window.
- Write a clear request in the AI input box.
- Let it produce a first version, then revise it section by section.
Step two is the key. The more specific your request, the closer the first version will be to what you want.
Edit these 12 clips into a 60-second video for me.
Pick the best shots, add B-roll, and use some upbeat music.
Its first version is a rough cut. A rough cut is a starting point for revision, not a finished video. Do not expect it to get everything right at once.
There are two ways to revise it:
- Keep talking. “This section is too long,” “Use music with more rhythm,” or “Delete the opening section.”
- Edit it yourself. Drag items manually on the timeline.
Mixing the two is easiest: use conversation for the overall structure and your hands for small details.
────────────────────────
5. Captions
Captions are text with timecodes that can appear in sync with the video. A transcript is the text recognized from speech, usually recording what was said.
In ChatCut, captions are text rather than baked into the picture. Editing the words edits the video.
Built-in styles include Plain, Netflix, and TikTok Pop. Select one to apply it. You can save your own settings as a saved style and reuse them next time.
Text-based editing is the real time-saver: open the transcript, select an unwanted passage, and press Backspace. The corresponding video is cut out, and the gap closes automatically. The transcript has paragraph and segment views; in segment view, you can also drag segments to reorder them.
You can also standardize pauses. The transcript track has “Gap” and pause controls to tidy up excessively long stops. It can only restore pauses already present in the recording; it cannot invent silence that was never recorded.
Reading through the transcript to fix words is much faster than finding sentences on a timeline. This is the core selling point of this kind of tool, and the biggest change in feel when switching from Jianying.
────────────────────────
6. Exporting
On desktop, exports run locally. Choose the output you need:
- Video file
- Audio
- Caption file
- Motion graphics
- A relinkable NLE media archive
Another option deserves its own explanation: turn the entire timeline into an editable Jianying Pro or CapCut draft. This is available only on desktop.
The process:
- Open the project in the desktop app and click Export at the top.
- The Chinese interface shows a “Jianying” tab; the English interface shows “CapCut,” provided the corresponding editor is installed on this computer.
- If more than one is installed, choose the target under Application.
- To include motion graphics, enable “Motion Graphics” under Include. This may require Pro, and it renders the graphics as transparent clips.
- If you see “Some content is not supported,” expand it and check: imported content is fine; unsupported items will need to be rebuilt in the target editor.
- When export finishes, click “Open Jianying Pro.” If Jianying is already running, click “Restart Jianying Pro” so the new draft appears.
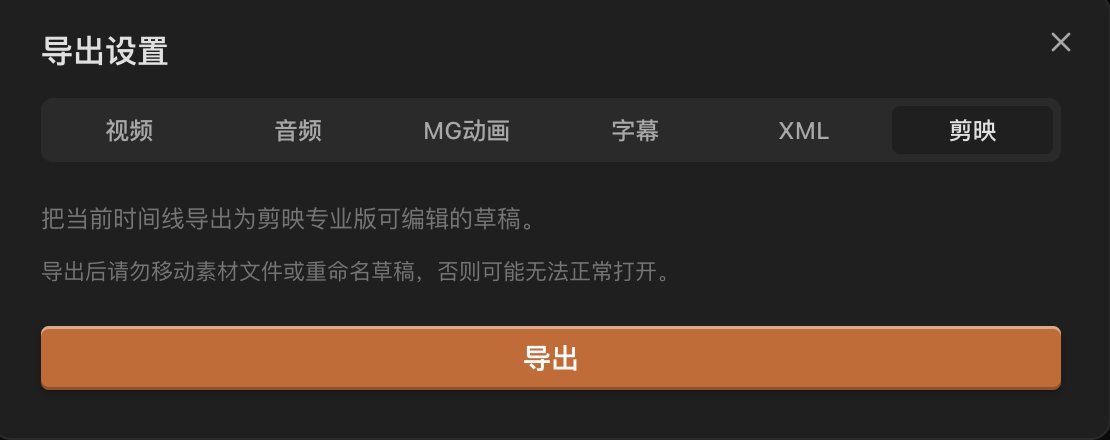
Note: it hands over a draft project, not a rendered MP4. ChatCut-specific properties are not guaranteed to transfer. Review the timeline in Jianying before delivery.
If the export button is disabled, open Jianying once so it creates its draft directory, then return and reopen the export settings.
────────────────────────
7. What Else Can It Do?
Here are some scenarios, each followed by a prompt you can use directly.
Find highlights
Find the key moments in these eight screen recordings and edit them into a 90-second tutorial.
Turn a talking-head clip into a finished video
Here is a talking-head video of mine. Tidy up the pauses and add captions.
Create motion graphics
Add a chapter animation to this video highlighting three key points.
The animations it makes are editable, not a flattened video. It can generate chapter bars, bar charts, pie charts, timelines, and typing animations for keywords.
Add visuals
These sentences describe someone building a website on their own. Add a few matching B-roll shots.
Generated shots support reference images: give it an image and it creates visuals with a similar feel.
Add music
Add gentle background music to this video that does not compete with the voice.
Generate a cover image
Generate a simple cover image and leave space for the title.
Search for media
Are there any city-at-night clips in the media library?
Package it up
Package this as a Jianying draft so I can continue editing in Jianying.
In actual use, the results are much better than those from the local tool in the previous article, especially ChatCut's voices and music! Below is a result generated by ChatCut. This was only a simple test; real production would be more involved.

(Video preview frame; this was a video in the original.)
────────────────────────
8. The Cost
ChatCut has two tiers: Free and Pro.
Free gives you the complete editor, with AI usage based on the allowance shown in your account. Pro includes recurring credits and unlocks more generation and delivery capabilities.
Manual editing does not use credits. Dragging timeline items, cutting clips, uploading media, and browsing projects cost no credits. AI processing and generation do, including generated videos, images, and music.
One suggestion: work through the entire process on the free tier first. Once you know it really saves you time, decide how much to spend.
For exact prices and credit amounts, check your account's billing page. The official documentation does not fix those numbers because pricing changes quickly. To check your balance, open the avatar menu → view your plan and balance → credit history. You can filter by day, type, and details.
Another easy mistake: exporting does not use credits, so buying a credit pack alone will not unlock the free tier's 60-minute web export allowance. That requires an active paid plan.
You can also install the ChatCut plugin in an agent such as ChatGPT to make videos, or sign in to ChatGPT within ChatCut. Try using it that way first! Pay for ChatCut credits when your requirements get demanding enough that you need them.
────────────────────────
9. Using It with Jianying
You do not have to choose between them. ChatCut Desktop can work together with Jianying.
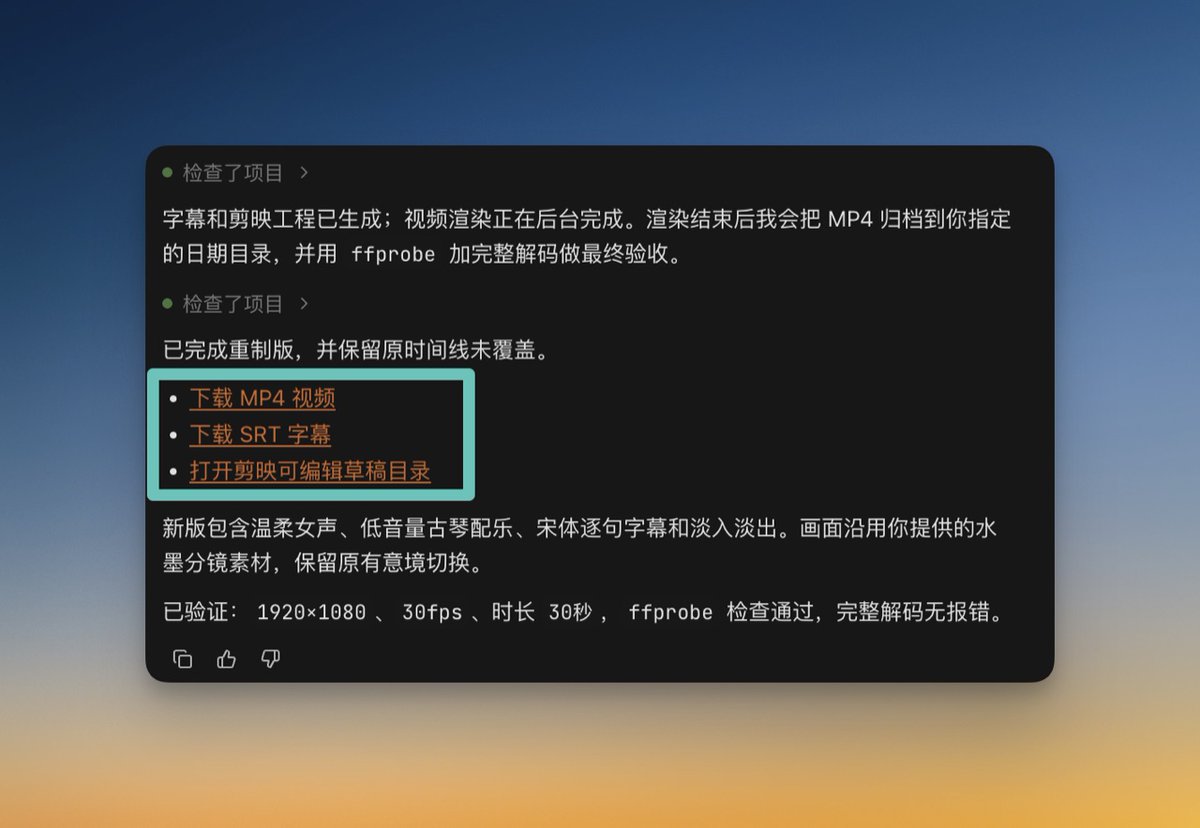
ChatCut handles the first version; Jianying handles the final 10%.
The most time-consuming part of a video is not the editing technique. It is going through hundreds of clips, finding usable material, and arranging it. Give that part to ChatCut.
Do the remaining polish in Jianying—aligning a transition to a beat or moving captions up two pixels. Your hands are more precise than typing for these details.
The Jianying draft export is designed for exactly this workflow.
────────────────────────
10. Strengths
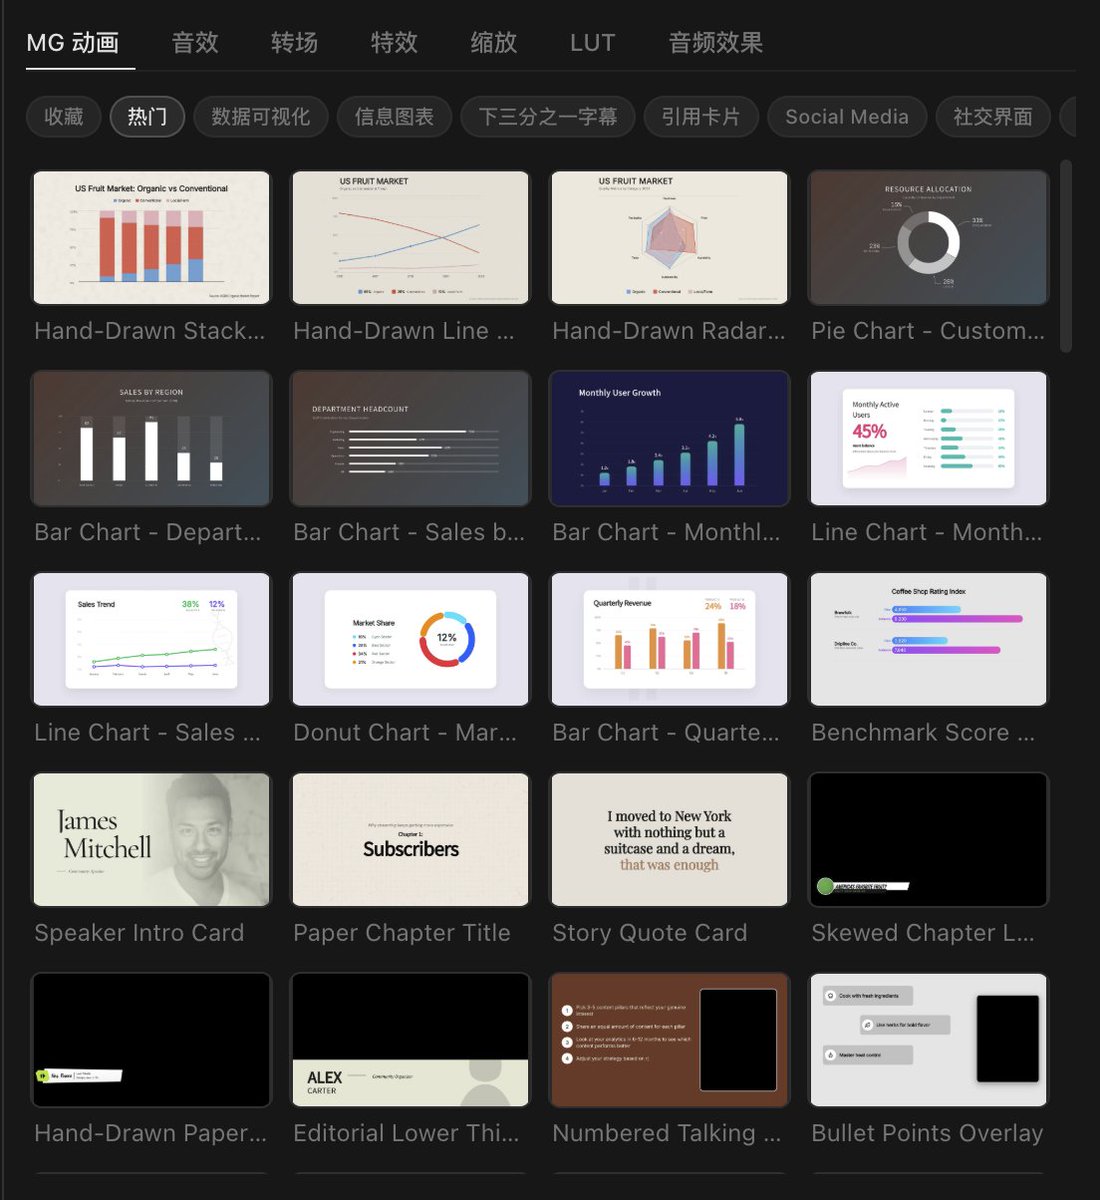
ChatCut has a very rich resource library, with options that feel fresher, more distinctive, and more engaging than Jianying's.
Common Pitfalls
It needs an internet connection. “Local media” means you do not have to upload your assets, not that every feature works offline. Generation tasks still need internet access.
If media is missing, do not import it again. If files cannot be found after reinstalling, use “Relink Files” and point to the originals. Importing again creates duplicates and wastes space.
Projects live in your account, not on your hard drive. Sign in to the same account on another device and your projects remain available. Local media paths belong to a particular machine, though, so you need to point to them again after switching computers.
The web export allowance is cumulative. The free tier's “60 minutes across all projects” does not reset monthly. Exporting itself uses no credits, so buying a credit pack will not unlock it; you need to upgrade your plan.
The free tier's AI allowance depends on how much you generate. Manual editing uses no credits, but generating lots of videos immediately can drain the allowance faster than you expect.
The Jianying draft export button is disabled. Launch Jianying Pro once so it creates the draft directory, then return and reopen the export settings.
It is normal to be unhappy with a rough cut. It gives you a starting point, not a finished product. The more specific your request, the closer that starting point is to the finish.
────────────────────────
Quick Reference
| What you want to do | What to say |
| Make a first cut | Edit this batch of clips into a 60-second video, pick highlights, and add gentle music |
| Find key moments | Find the key moments in these clips and make a 90-second video |
| Remove pauses | Tidy up the pauses and add captions |
| Add animation | Add a chapter animation highlighting three key points |
| Add visuals | These sentences cover a topic; add a few matching B-roll shots |
| Add music | Add gentle background music that does not compete with the voice |
| Generate a cover | Generate a cover image with space for the title |
| Search for media | Are there clips in a particular style in the media library? |
| Package | Package this as a Jianying draft |
────────────────────────
Finally
Remember four things.
First, you describe the job and then it edits. Explaining your requirements clearly matters much more than knowing every button.
Second, the first version will be rough. Its value is saving you the work of selecting and arranging clips, not getting everything right on the first attempt.
Third, it works as a pair with Jianying. AI makes the rough cut; you polish it in Jianying. Exporting an editable Jianying draft enables this workflow. Remember that it hands over a draft project, not a finished video.
Fourth, captions are edited as text, not as part of the picture. This is the biggest difference in feel from Jianying, and it is worth spending ten minutes trying it separately.
Try the free tier first and pay once the workflow works for you. #chatcut #codex #AIEditing